Free to really get started.
The Home firmware is free and complete for home use: sensors, outputs, timers, alerts and automations, every limit at 8. Start from a real test and only then decide whether you need PRO.
Local RF433 automations with a minimum 3-board kit: install the firmware from the browser, get one sensor recognized and create the first rule without code or soldering.
We will let you know when it is time to flash.
Ordered the kit? Leave your email: we will write when it arrives, with the step-by-step guide. No spam, just this.
How it is built: 3 boards
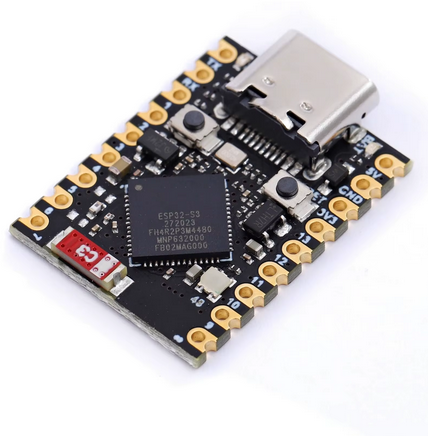
ESP32-S3 main board
The black USB-C board you load with the free Home firmware.
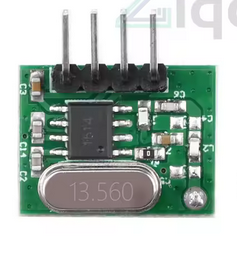
RF433 module A
One of the two small green modules in the RF kit.
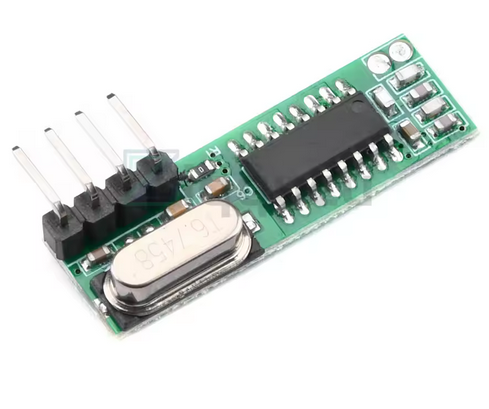
RF433 module B
The second green module: together they provide receiving and transmitting.
Practical attention: they are not wires to connect: the two green modules plug into the black board in the correct direction. The videos show pin alignment and precautions before powering on.
3
boards to plug in
~5 EUR
minimum hardware
0
solder joints
Video
practical precautions
Start free
First verify the minimum result: build the kit, get one sensor recognized and create a local rule.
Your first result
Open a door, press an RF433 button or place the water sensor on two drops.
The local panel shows the received code and asks how you want to name that event.
Write a simple logic: if this happens, then send an alert or activate a compatible output.
The Home firmware is free and complete for home use: sensors, outputs, timers, alerts and automations, every limit at 8. Start from a real test and only then decide whether you need PRO.
It is built with 3 boards: one main board and two RF433 modules that plug on top. You do not open sockets, run wires through walls or work inside electrical panels.
The first goal is concrete: get one sensor recognized, name it and create one local rule. If that works, the rest makes sense.
Rolling-code, modern gates, encrypted remotes and certified alarm systems stay out. DIYLOGIC does not copy or bypass them.
One ESP32-S3 board and two RF433 modules to plug in by following the videos.
Save one sensor, give it a name and create a local rule from the browser.
Door, water and PIR sensors, buttons, sirens, relays and compatible radio sockets.
6
supported languages
100%
local, no cloud
0 €
Home firmware
Open
code and protocol
“I thought you needed to know how to code. In one evening I got the door sensor recognized and created my first alert.”
“The fact that everything stays at home, with no account or cloud, is why I chose it over commercial hubs.”
“I connected cheap RF433 sensors to my PLC via Modbus: with DIYLOGIC it became the local bridge I was looking for.”
Hundreds of makers are building local automations. Join in, ask for help and show what you built.
Join the communityOrder the kit
This is only about the physical build: main board, two plug-in modules, correct direction and aligned pins. No soldering iron, breadboard or electrical panel to open.
Shipping usually takes 2–4 weeks. Leave your email below: we will let you know when it is time to flash, with the step-by-step guide.
Pick where you start from: we take you to the right path in one click. No code, no account.
On Windows, Linux or Mac use Chrome or Edge: connect the board with a USB-C data cable and the install runs from the browser, with nothing to install.
You need a USB-C data cable, not just a charging one: it is the number-one reason the computer does not see the board. When in doubt use your phone’s cable or try another.
Connect the board to the computer with a USB-C data cable and click: installation starts from the browser and shows progress. On Android, the correct path is the DIYLOGIC Flasher app via USB-C/OTG.
Your WiFi credentials stay private. The network name and password are sent straight from the browser to the board over the USB cable and saved only on the device. They never travel over the internet, are not sent to us or any third party, and are not shared with anyone.
After you pick the WiFi, the board connects and shows its IP address (e.g. http://192.168.1.42): tap “Visit device” to open the panel. If diylogic.local does not open, use that IP address in the browser. Note it down: it is the address of your DIYLOGIC on your home network.
Video
Every guide follows the same principle: photos, colors, checklists and short steps. If you can plug in a phone charger, you can follow the path.
The overview for absolute beginners: what you receive, how it goes together without soldering, how you install it from your phone and how the first alert reaches your smartphone. If you watch only one video, watch this one.
Watch the overviewThe 3 real boards in hand: which one is the main board, which are the two RF433 modules and — above all — which USB cable actually works (the number-one reason the first step goes wrong).
Guide coming soonFrom a computer, open the site in Chrome or Edge and install from the browser. From Android, open the DIYLOGIC Flasher app and connect the board with USB-C/OTG. On iPhone, use DIYLOGIC after the board has already been flashed.
Guide coming soonThe two green modules sit on the black board the right way round. Orientation, pin alignment and what to check before powering on: slow, up close, no rush.
Guide coming soonOpen a door or press a remote: DIYLOGIC sees the signal, you give it a name and create your first local rule without writing code. The win that proves it works.
Guide coming soonThe computer does not see the board, diylogic.local will not open, the sensor is not recognised. The most common causes and how to fix them in a minute, no panic.
Guide coming soonThe concrete goal: when a sensor trips, an alert reaches your smartphone. How to link the notification to a rule, explained in plain words.
Guide coming soonHow it works
From a blank board to the first automation, the path is guided and visual. From a computer, install from the site with Chrome or Edge; from Android, use the DIYLOGIC Flasher app via USB-C/OTG; then open the local webapp at http://diylogic.local.
You need a USB-C data cable, not just a charging one: it is the number-one reason the computer does not see the board. When in doubt use your phone’s cable or try another.
Connect the board to the computer with a USB-C data cable and click: installation starts from the browser and shows progress. On Android, the correct path is the DIYLOGIC Flasher app via USB-C/OTG.
Your WiFi credentials stay private. The network name and password are sent straight from the browser to the board over the USB cable and saved only on the device. They never travel over the internet, are not sent to us or any third party, and are not shared with anyone.
After you pick the WiFi, the board connects and shows its IP address (e.g. http://192.168.1.42): tap “Visit device” to open the panel. If diylogic.local does not open, use that IP address in the browser. Note it down: it is the address of your DIYLOGIC on your home network.
Already installed and set up your board?
Open your device's panel on your home network: it must be powered on and connected to your WiFi (first setup already done via the captive portal).
Open my DIYLOGIC diylogic.localIf the local name does not respond, use the IP address your router assigned to the board.
The recommended path starts from one USB-C ESP32-S3 board and two small plug-in RF433 modules. The total cost of the minimum hardware stays around 5 EUR.
From a computer, use Chrome or Edge and install from the browser. From Android, use the DIYLOGIC Flasher app with a USB-C/OTG cable. iPhone cannot flash over USB: use DIYLOGIC after the board has already been flashed.
The two modules must be inserted on the main board respecting direction and pin alignment. Do not force the plug-in: the practical precautions are shown in the videos.
Power the board, open the DIYLOGIC network from your phone and choose your home WiFi. From then on, type http://diylogic.local in the browser; if the local name does not respond, use the IP assigned by the router.
Open a door, press a remote or trigger a water sensor. DIYLOGIC detects the fixed-code RF433 signal and asks what name you want to give it.
Compatible devices
DIYLOGIC works with fixed-code RF433 devices: door, water and PIR sensors, buttons, sirens, lights, relays and compatible radio sockets.
Tap a card to open an AliExpress search for the indicated device.
Door or window contact
AliExpressIt alerts you if a door opens when you do not expect it.
Water / flood sensor
AliExpressPlace it under a washing machine or sink: if it detects water, it can send an alert or trigger a compatible output.
PIR motion sensor
AliExpressIt activates when someone passes by. Useful for corridors, garages and service lights.
Smoke detector
AliExpressAdds a phone alert to compatible radio devices, without replacing certified systems.
Radio remote
AliExpressOne button to start a scene, switch off a socket or trigger a local rule.
Wireless button
AliExpressPut it near the bed, entrance or garage: press it and DIYLOGIC runs the rule.
Radio relay module
AliExpressCan switch small loads on or off via a compatible RF command, without pulling a new wire.
Radio socket
AliExpressSwitch off a light or compatible appliance with a local rule.
Radio MOSFET module
AliExpressFor low-voltage lights and LED strips when using compatible fixed-code modules.
Radio siren
AliExpressCan sound when a local rule decides that a strong alert is needed.
Phone dashboard
AliExpressWith compatible apps you can see states, buttons and values on a more convenient screen.
Panels and workshops
AliExpressFor expert users, DIYLOGIC can act as a local bridge between low-cost sensors and technical supervision.
Warning: rolling-code devices, including motorized gates, certified alarm systems and encrypted remotes, are not compatible by design.
From your country? DIYLOGIC uses the 433 MHz radio: it is the standard in Europe, much of Asia and many other countries. In North America several cheap devices use 315 MHz instead. Before buying, check that sensors and modules are 433 MHz and fixed code.
Real scenarios
home
A water sensor detects a leak under the washing machine. DIYLOGIC can send you an alert and activate a siren or compatible radio output.
Estimated total cost: Home to start
garage
Garage door, pedestrian gate, garden shed: bring the event onto the network without breaking walls or running conduits.
Estimated total cost: ~5 EUR hardware
lights
At sunset, a radio socket switches on the driveway light. The rule stays local and does not depend on a cloud server.
Estimated total cost: ~5 EUR accessories
notifications
The doorbell rings while you are away. You receive an alert and can turn on a compatible light to simulate presence.
Estimated total cost: ~6 EUR accessories
school
A class learns events, logic and automation with real sensors, a low-cost board and no programming language.
Estimated total cost: ~5 EUR per bench
safety
Door and window sensors are read in real time. It is not a certified alarm system, but it can give you a useful view of the home.
Estimated total cost: ~20 EUR with multiple sensors
Vs alternatives
DIYLOGIC does not try to sell you a closed hub: it takes low-cost fixed-code radio sensors and puts them into a guided, local and understandable path. It stays on at about 1 W: 8.76 kWh/year, about 2.60 EUR/year at 0.30 EUR/kWh.
Needs a soldering iron
DIYLOGICNo
Free solutionsOften no, but setup is needed
Commercial hubsProfessional installation
Requires programming knowledge
DIYLOGICNo
Free solutionsOften yes, or close to it
Commercial hubsRequires technical skill
Works without mandatory cloud
DIYLOGICYes
Free solutionsDepends on the setup
Commercial hubsDepends on the product
Fixed-code RF433
DIYLOGICReceives and transmits
Free solutionsVariable support
Commercial hubsNot always included
Local IF/THEN automations
DIYLOGICBuilt in
Free solutionsRequires combining multiple tools
Commercial hubsDepends on the system
Cost to start
DIYLOGIC~5 EUR hardware
Free solutionsHardware + hub + time
Commercial hubsUsually much higher
Always-on consumption
DIYLOGIC~1 W (8.76 kWh/year)
Free solutionsLinux mini PC: typical 6-15 W
Commercial hubsVariable
Annual energy cost
DIYLOGIC~2.60 EUR at 0.30 EUR/kWh
Free solutions~15.80-39.40 EUR
Commercial hubsDepends on the product
Annual saving
DIYLOGIC~13-37 EUR versus a Linux mini PC
Free solutions-
Commercial hubs-
Smartphone path
DIYLOGICGuided
Free solutionsNot always
Commercial hubsRare
Home free and PRO
The Home firmware is free and has the local logic functions for home use, every limit at 8. PRO is a dedicated firmware that raises the counts to 32 and adds Modbus TCP for PLC/SCADA, advanced automations and all RF PRO nodes: after purchase you download and install the Pro binary.
01
The Home firmware is free and includes the local logic functions for home use: sensors, compatible outputs, automations, timers, alerts and a browser panel, every limit at 8.
02
Rules live on the board, not in a mandatory cloud service: they keep working offline.
03
When you need Modbus for PLC/SCADA, counts at 32 and advanced automations, you install the Pro firmware: one-time license at the 5 EUR launch price.
0 EURHome firmware, free forever
The Home firmware is free, forever, and complete for home use: fixed-code RF433 sensors, radio outputs, IF/THEN automations, timers, alerts and a local panel from the browser. Every limit is 8. It works offline, with no cloud.
Download free9.90 EUR5 EURuna tantum
A dedicated firmware that raises every count to 32 and adds Modbus TCP for PLC/SCADA, advanced automations and all RF PRO nodes. After purchase you download and install the Pro binary: the features stay yours forever, offline, with no subscription. The first year of firmware updates and special content is included.
Launch price 5 EUR guaranteed until July 15, 2026. Then 9.90 EUR.
Buy PROThe Home firmware is free and complete for home use. PRO is a separate, dedicated firmware with a one-time license; if you want to support development beyond the license, you can leave a free donation.
What is inside
Guides in progress, with a beta preview already available: installation, pinout, Modbus registers and first scenarios.
The path stays visual even when you update the device or change configuration.
Automations live inside the device. Internet services are only accessories.
Timers, delays, multiple conditions, five notification channels. When you need them, they are there.
Frequently asked questions
DIYLOGIC works on 433 MHz, the standard in Europe, much of Asia and many other countries. In North America several cheap devices use 315 MHz instead: before buying, check that sensors and modules are 433 MHz fixed code. You remain responsible for complying with local radio rules.
Start from the free Home firmware precisely to reduce this risk: you test the sensor without buying PRO. Look for fixed-code RF433 devices; if it uses rolling code, encryption or is meant for gates and certified alarm systems, it is not the right product.
The Home firmware is free and includes the local logic functions for home use: sensors, outputs, timers, alerts and automations, every limit at 8. PRO is a dedicated firmware that raises the counts to 32 and adds Modbus TCP for PLC/SCADA and advanced automations: after purchase you download and install the Pro binary. One-time payment, 5 EUR launch price (then 9.90 EUR), no subscription; the features never expire. Updates and special content are included for the first year, then renewable (the PRO features stay yours either way).
With PRO you unlock the PRO features on your device FOREVER: one-time, offline, with no subscription on the features. The first year of firmware updates and special content is included. After 12 months the PRO features stay yours and everything you already downloaded keeps working: only NEW updates and content stop, and you can re-enable them with an optional yearly renewal. Nothing shuts off and no device gets locked.
Yes. The path is designed exactly for this. You start from 3 ready boards: one main board and two RF433 modules to plug in carefully. You do not need to write code, solder or know electronics or lab tools.
Not necessarily: from Android you can use the DIYLOGIC Flasher app with a USB-C/OTG cable. From a computer, use Chrome or Edge and install from the browser. After first boot, open DIYLOGIC at http://diylogic.local. On iPhone, use the webapp after the board has already been flashed.
The hardware: the 3 boards cost about 5 EUR in total. The Home firmware is free and includes the local logic functions for home use. PRO is an optional, dedicated firmware, one-time (5 EUR launch price, then 9.90 EUR), with no subscription.
PRO is the dedicated paid firmware: it raises the counts to 32 and adds Modbus TCP, advanced automations and all RF PRO nodes. You install it in place of the Home firmware, which stays free for home use.
Only if it is fixed-code RF433. Gates, certified alarm systems and modern remotes often use rolling code or encryption: DIYLOGIC does not copy or bypass them, for safety and correctness.
No, it must not be presented or used as a certified alarm system. It can alert you, activate compatible radio sirens and create home automations, but it does not replace a certified security system.
Not for local rules. Internet is only needed for accessory features like external notifications, weather, updates and time sync. Local automations work offline anyway.
Modbus should only be used inside a trusted local network. Do not expose the Modbus port to the internet and do not use it as a security boundary.
The most common problems have a simple solution, and none of them breaks the board. If you get stuck, the community lends a hand.
Browser flashing only works from a computer with Chrome or Edge. From Android, use the DIYLOGIC Flasher app via USB-C/OTG. From iPhone, use the webapp after the board has already been flashed.
Almost always it is the USB cable: many cables only charge and do not carry data. Use your phone’s data cable or try another one, then reconnect the board.
Wait a minute after powering on and try again. If the name does not respond, use the IP address your router assigned to the board (you find it in the router app or page).
Move closer to the board, press several times and check the sensor is RF433 fixed code. Rolling-code and encrypted remotes are not compatible, by design.
Unplug and reconnect the power. Your rules stay saved on the board: you lose nothing and nothing breaks.
For installers, PLC programmers and advanced makers
If you are an installer, PLC programmer or experienced maker, this is the next level. Everything above is the same thing, told in simpler words.
Standard server on port 502, readable by PLCs, SCADA and custom software on the LAN.
Reference pinout: RX on GPIO 4, TX on GPIO 5, I2C on GPIO 8 and 9.
All included and free: local automations, sensors, outputs, timers and alerts.
Modbus TCP protocol
DIYLOGIC exposes a standard Modbus TCP server on port 502. Fully documented coils, input registers and holding registers, readable and writable from any Modbus master on your local network.
No MQTT broker, no cloud, no intermediate adapter. Just TCP/IP and the register map.
A door opens, a button is pressed, a sensor detects water. The fixed-code RF433 signal reaches the receiver.
The device normalizes the signal into states, events, coils and Modbus registers. The local engine can use it as a condition.
A PLC, software or dashboard reads those values via Modbus TCP and decides what to do: switch, stop, alert or log.
Real register example
Example of the registers the device publishes in real time. PLCs, SCADA and custom software read these values with standard polling.
LAN node
Mobile dashboard
Virtuino IOT (free Android app) connects directly to the firmware Modbus TCP server. Build graphic dashboards with widgets, indicators, buttons and real-time charts without writing code.
Configure the node IP address and port 502, then map coils and registers to widgets. It is one of the fastest ways to give the system a smartphone-friendly interface.
virtuino.comPLC and industrial systems
Any Modbus TCP master can read and write DIYLOGIC registers. Tested with common targets in the Italian and European PLC world.
No intermediate brokers, no cloud. Everything in LAN, in real time.
Reference hardware
Supported I2C expansions: PCF8574 for 8 additional relays on COIL 8-15, DS3231 as RTC for accurate time even offline.
Firmware capacity
Philosophy
DIYLOGIC starts from a simple choice: make home automation understandable, affordable and local. Cloud can add services, but it should not decide whether a light, sensor or alert can work.
Offline mode
The ecosystem DIYLOGIC hubs can keep working even without an internet connection.
In offline mode, local rules stay on the board: the sensor speaks, the device listens, the automation decides. Internet remains useful for updates, accessory services and external notifications, but it is not the foundation of the home.
The heart of the system stays at home: local automations keep working even without internet. The network is useful when it adds value, not when it becomes a leash.
Home automation logic should be within everyone’s reach, anywhere in the world. DIYLOGIC aims for a minimum kit of about 5 EUR and visual steps that lead to a real first result without a lab.
No closed hubs, no forced subscription, no automations that stop living if a remote service changes rules. Your home stays yours, understandable and modifiable.
Using a low-power board and affordable RF433 sensors means giving simple devices new usefulness, avoiding waste and building only what is really needed.
Ethical value
The best technology does not force you to buy everything again: it helps you understand, reuse and choose.
That is why DIYLOGIC prefers small, affordable and documentable hardware, simple sensors and local automations. It is a technical choice, but also a cultural one: fewer closed boxes, fewer dependencies, less waste and more autonomy for people who learn by doing.
Plain words
No surprise jargon. Here are the few terms you will see, said the way you would tell a friend.
The program that makes the board work. “Installing the firmware” means copying DIYLOGIC into the little board, just once.
È il modo tecnico di dire “installare il firmware”. Da computer lo fai dal browser; da Android lo fai con l’app DIYLOGIC Flasher via USB-C/OTG.
The name of the main board: a tiny computer costing a few euros, about the size of a couple of coins.
The 433 MHz radio that cheap sensors use to talk to the board, wirelessly.
Sensors that always send the same code: those are the compatible ones. Modern gates use “rolling code” and do not work.
The screen you open from the browser to control everything. It lives inside the board, not on the internet.
A technical language to connect DIYLOGIC to professional systems. Beginners do not need it: it is a PRO feature for experts.
Talk to us
Drop us a couple of lines or stop by the community: we are happy to answer, beginner questions included. No question is too simple.
Start
Start right away: install the free Home firmware, plug in the modules and create your first local automation.